Getting Started 🚀
This quickstart guide will take you through the steps required to onboard a device and connect to it through Nexigon’s remote access functionality. End-to-end this guide should take less than 15 minutes to complete. Let’s get started!
Creating an Organization
Within Nexigon, access rights are scoped to organizations at the top level. To on-board a device, you first need to create an organization (if you haven’t done so already). After signing up for an account in Nexigon Cloud, you will be greeted by a dialog to create an organization.
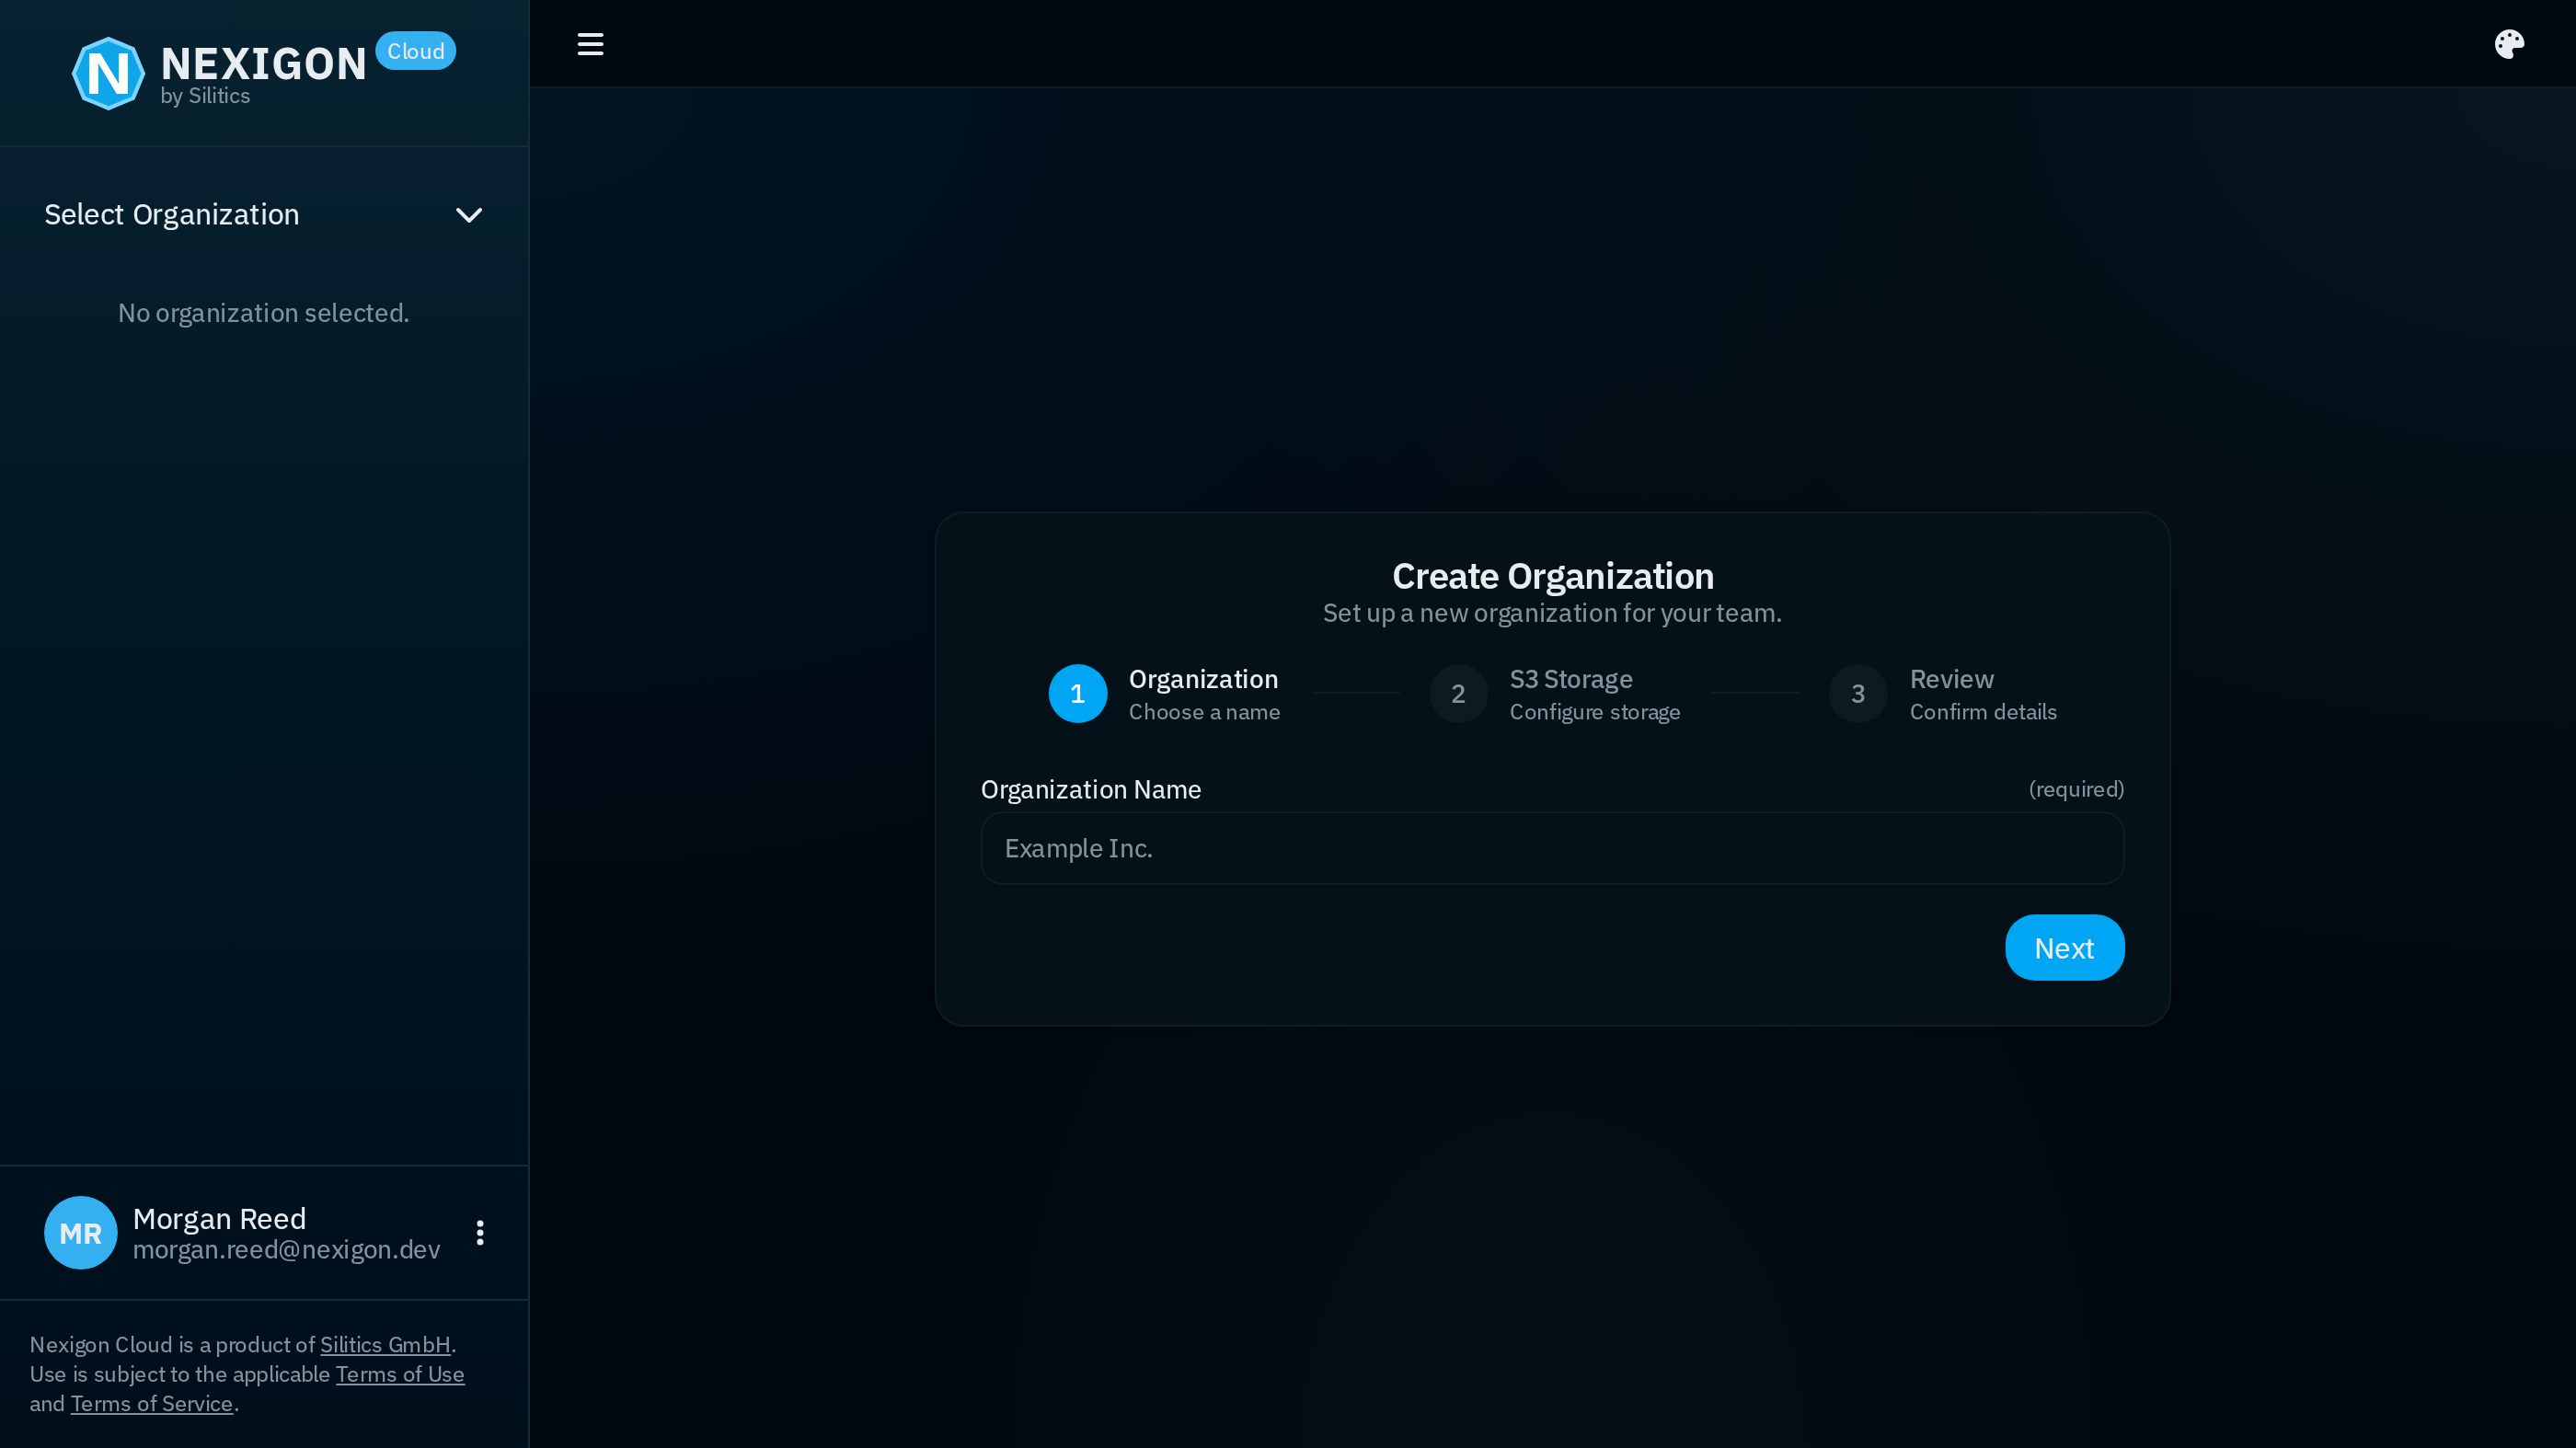
As part of the organization creation, you are asked for S3 credentials. Those are required for the software artifact management functionality. You can use any S3-compatible provider or just skip this step for now.
Onboarding a Device
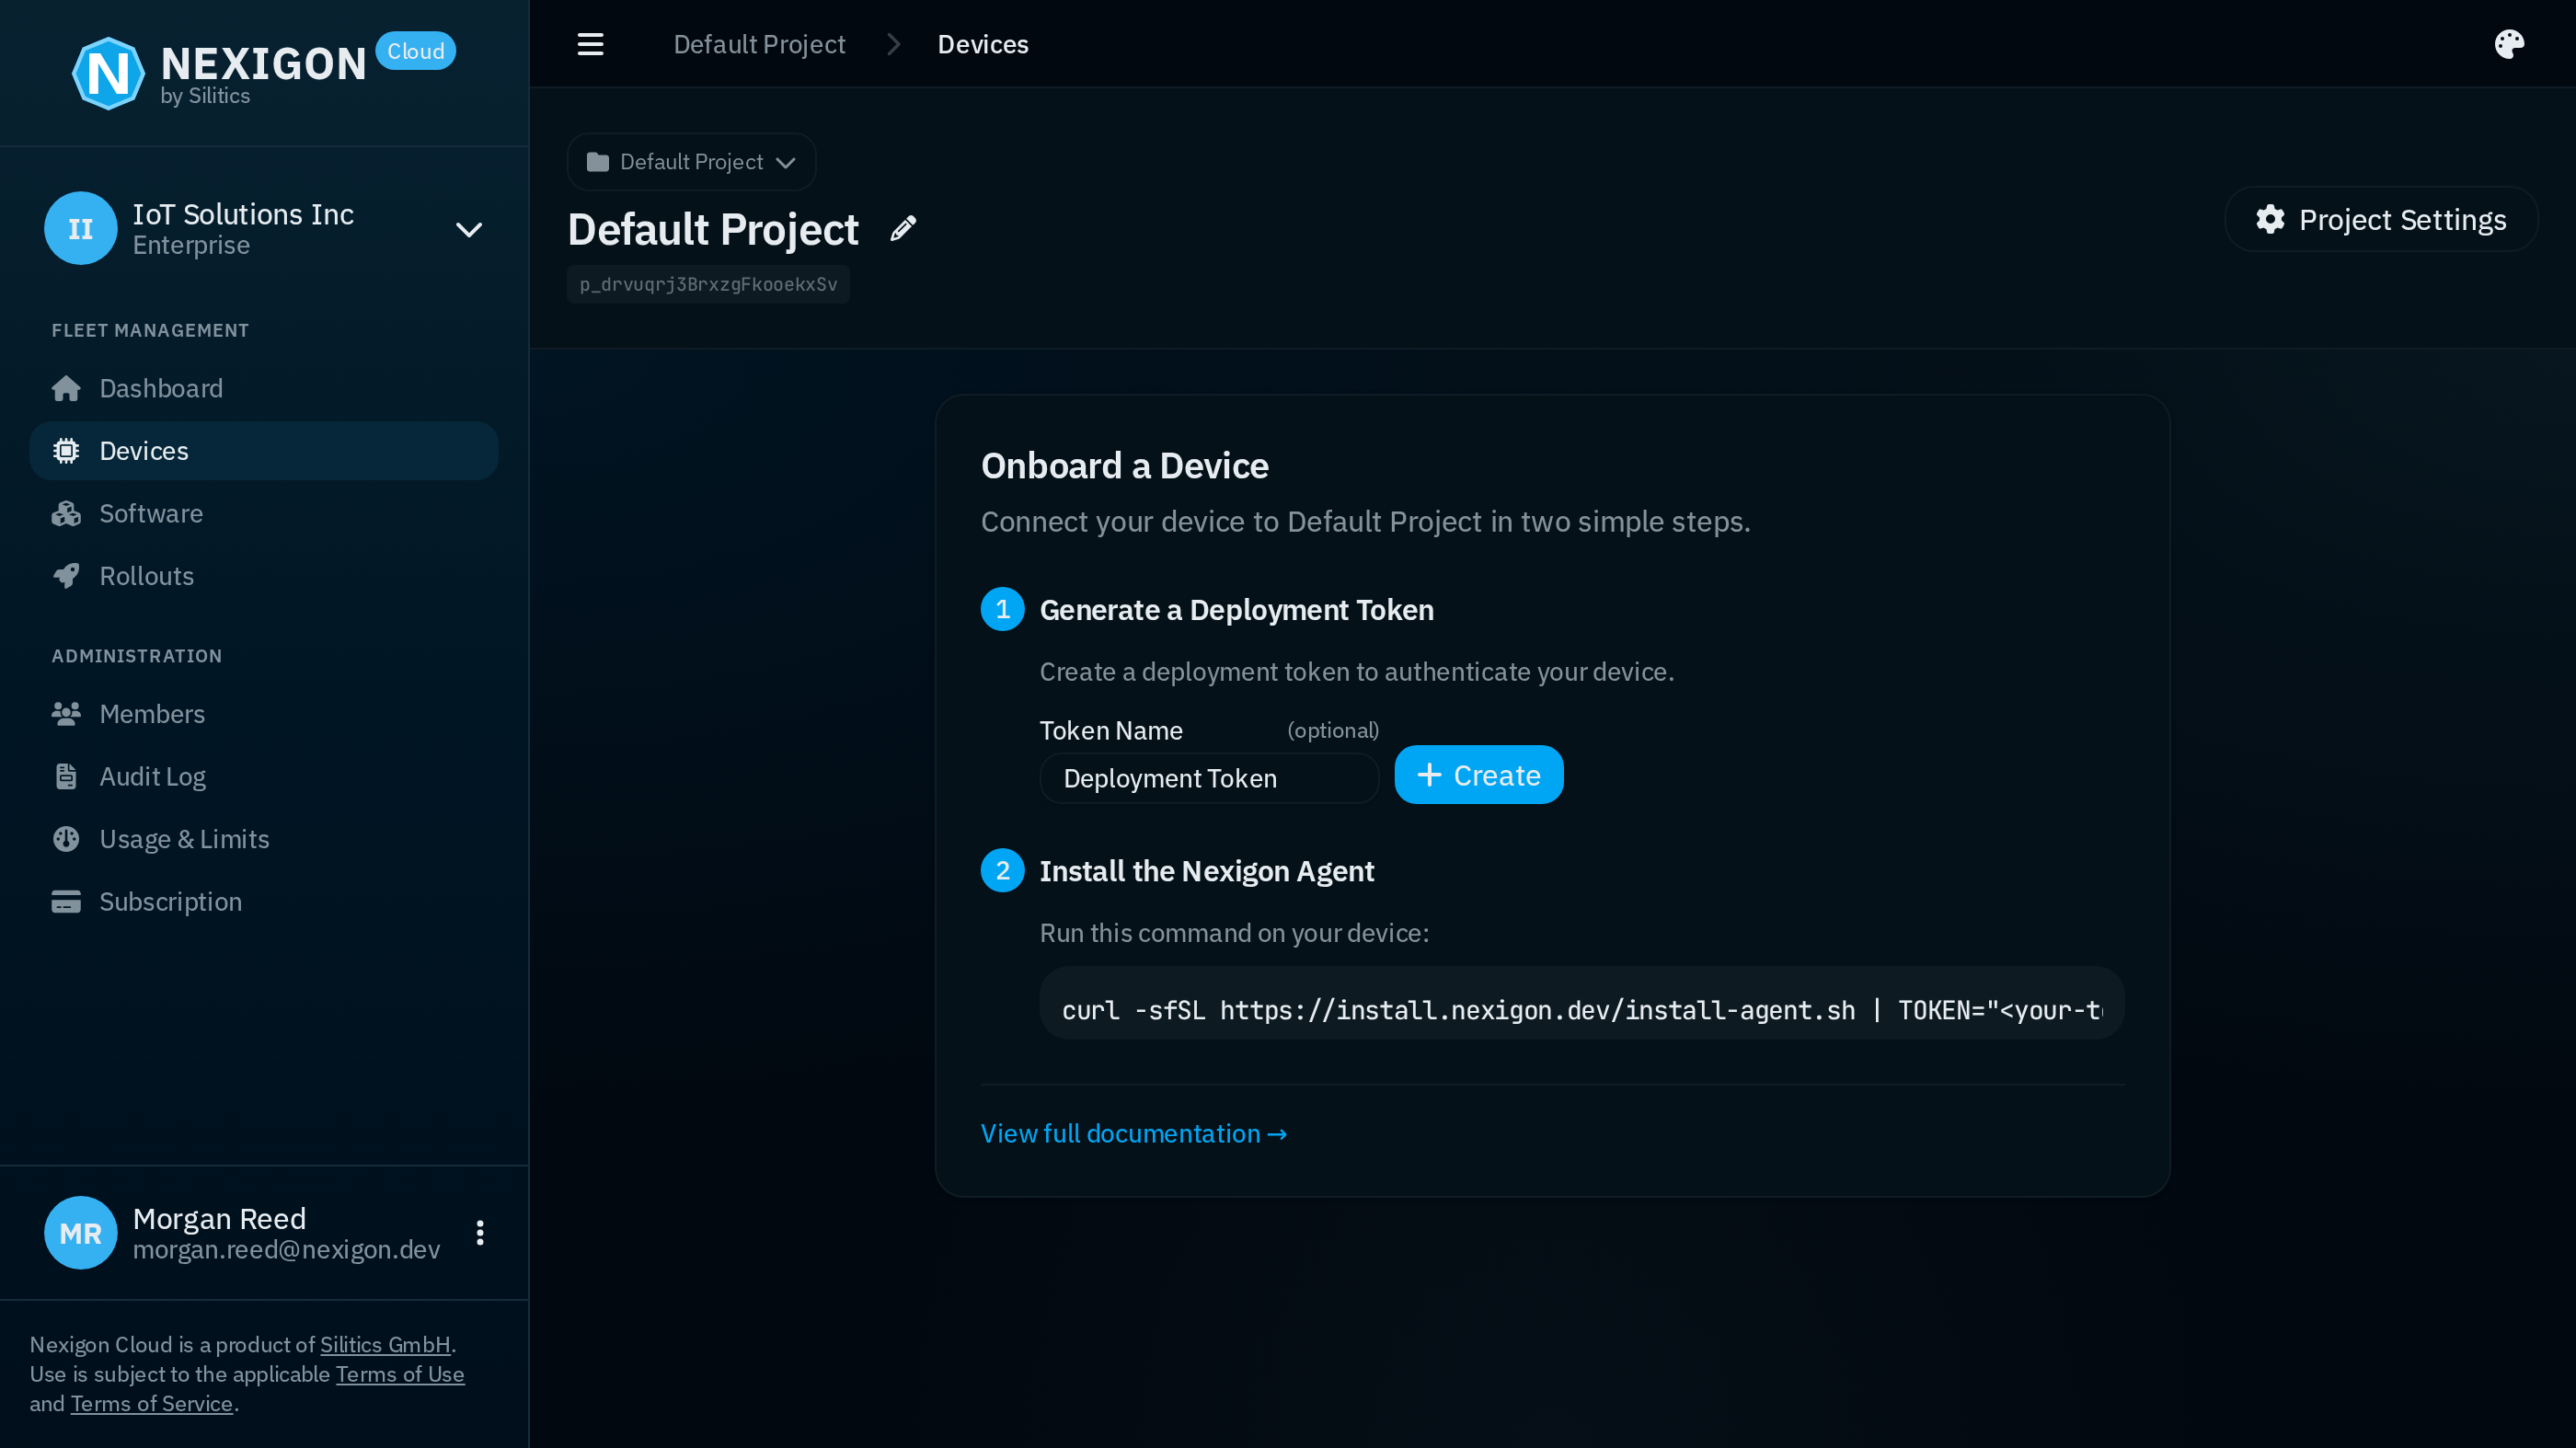
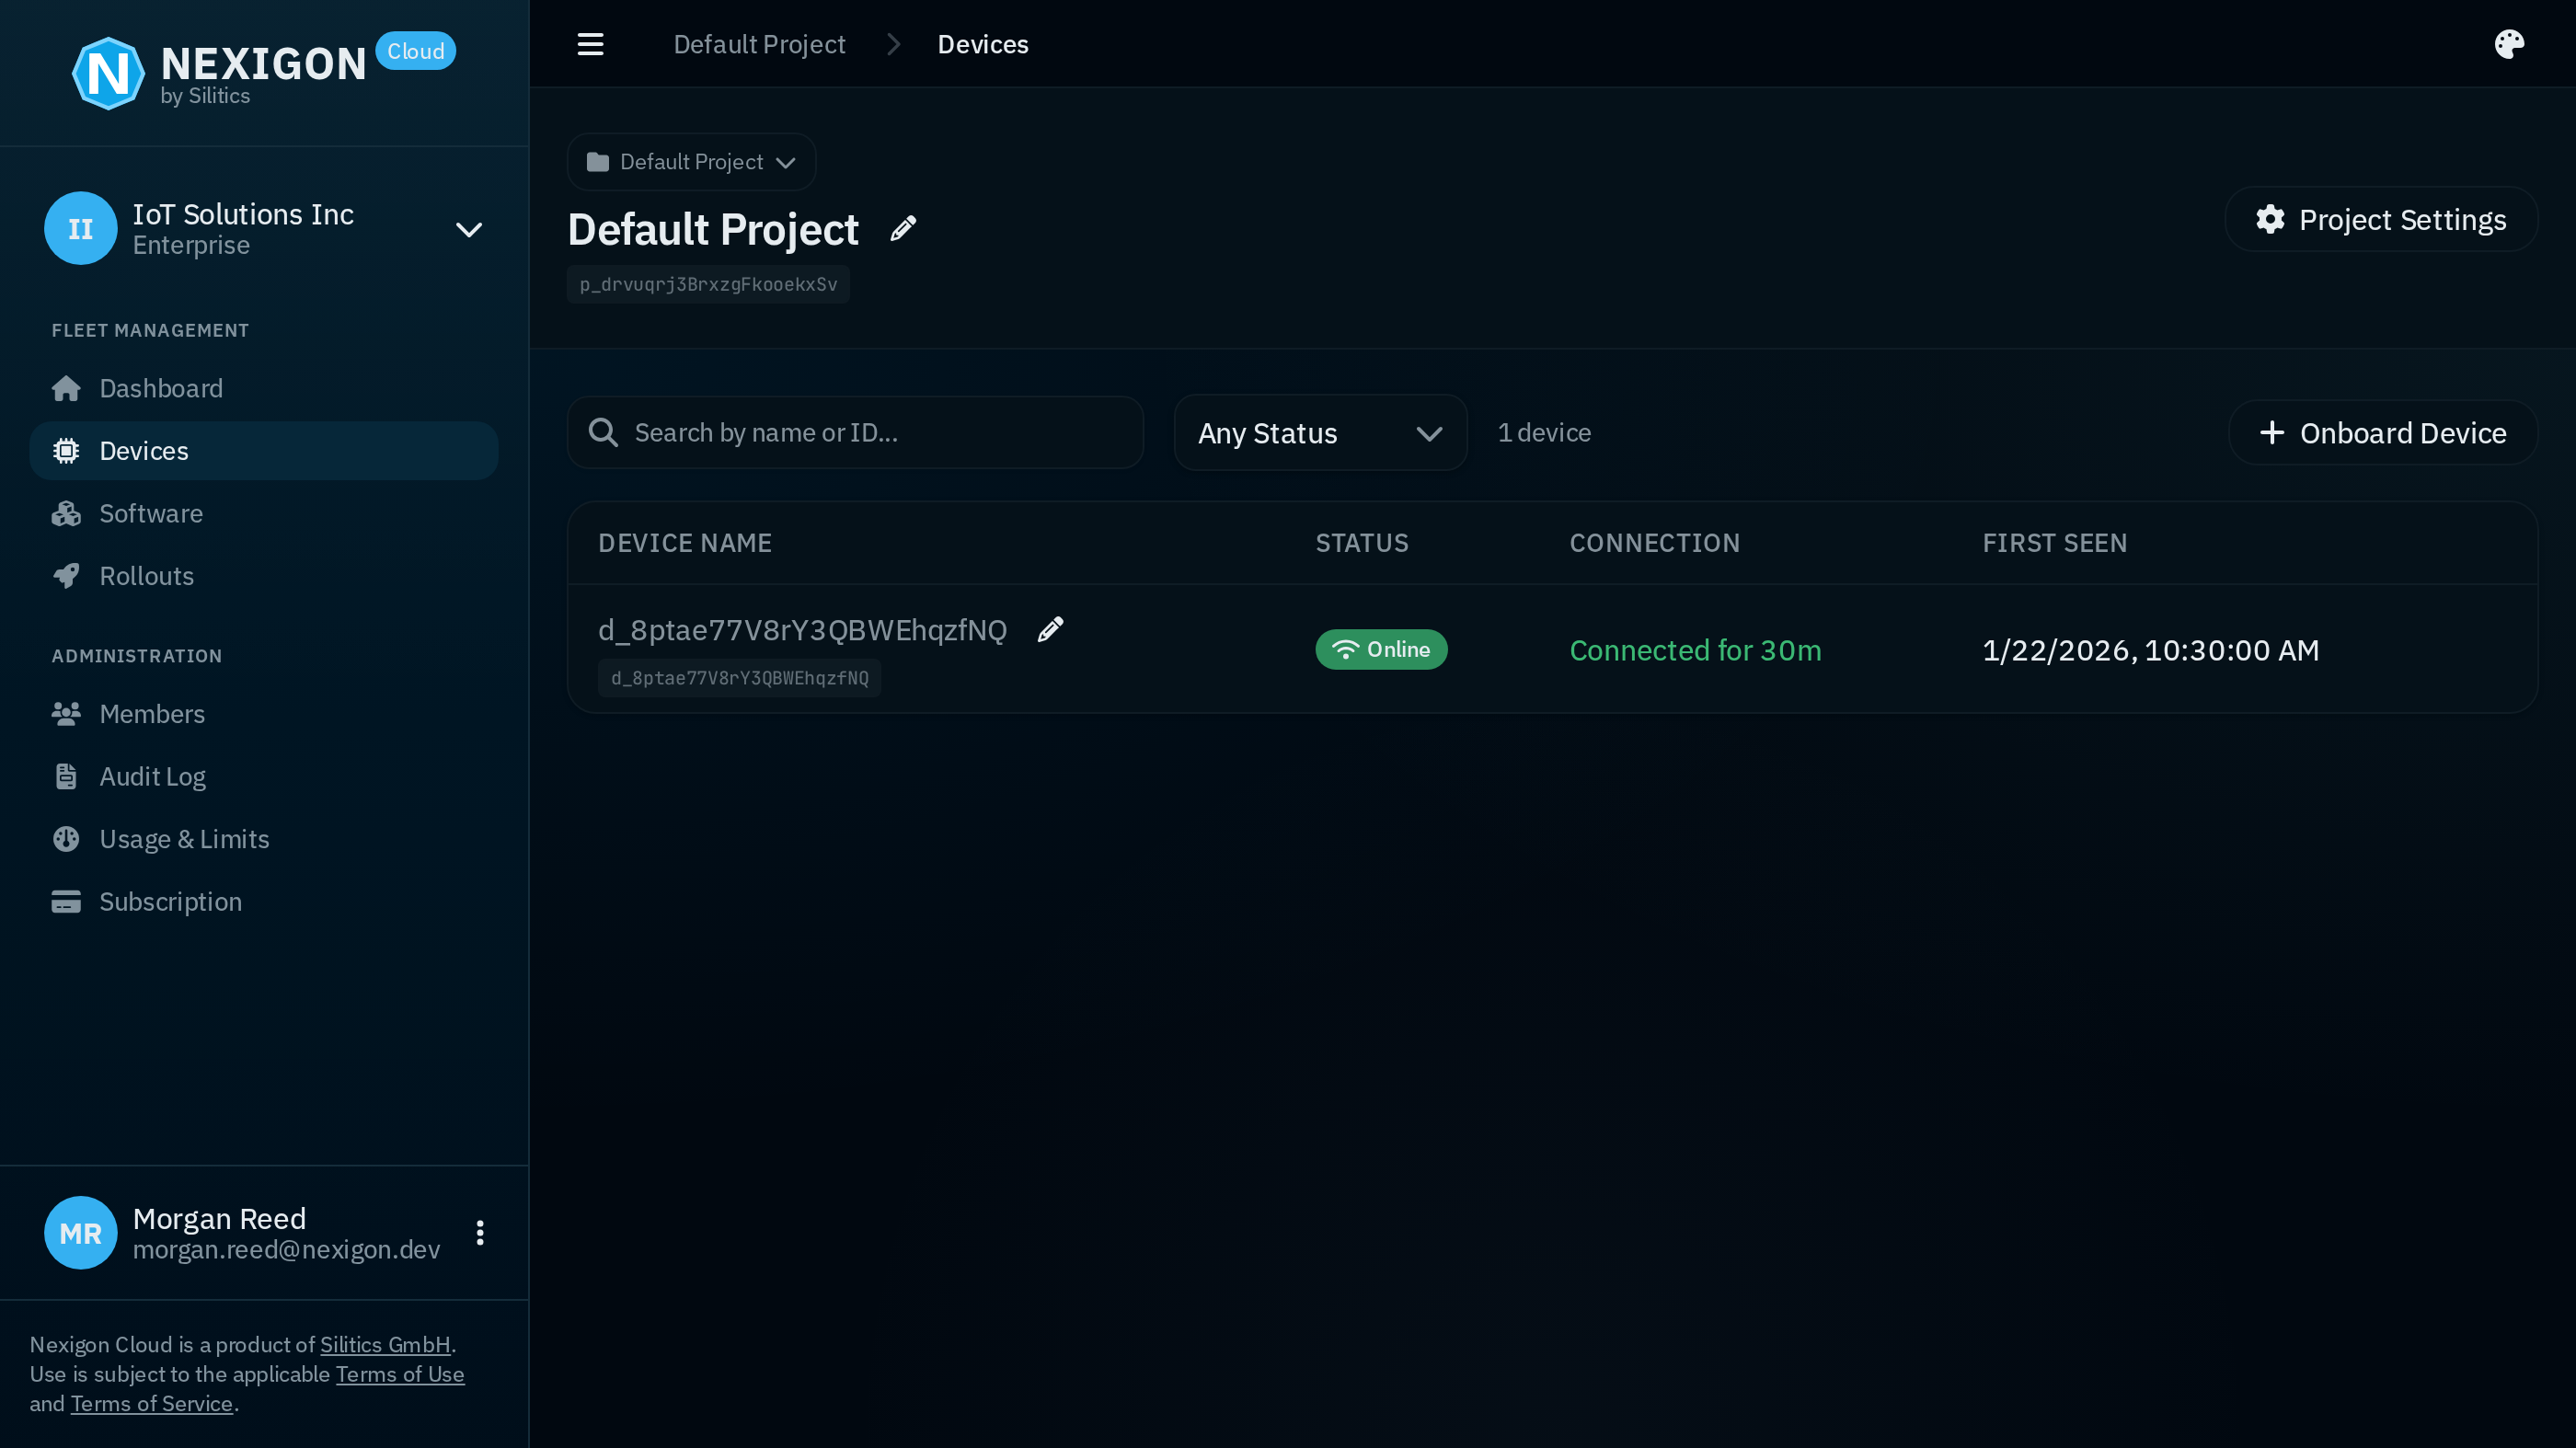
Within Nexigon, devices are organized into projects. Projects are useful, e.g., to strictly isolate production and testing environments. When creating an organization through Nexigon Cloud, a “Default Project” will be created for you. Initially, the Default Project won’t have any devices connected to it and you will be greeted with an onboarding dialog when opening the Devices view through the sidebar on the left:
With Nexigon, security is a non-negotiable design principle. When you connect a device, it authenticates using three independent factors to ensure that only authorized devices can join your infrastructure:
- Device Certificate — unique cryptographic identity of a device used for mutual TLS authentication.
- Deployment Token — identifies the target project and may constrain what a device is allowed to do.
- Device Fingerprint — hardware-specific fingerprint computed from hardware characteristics.
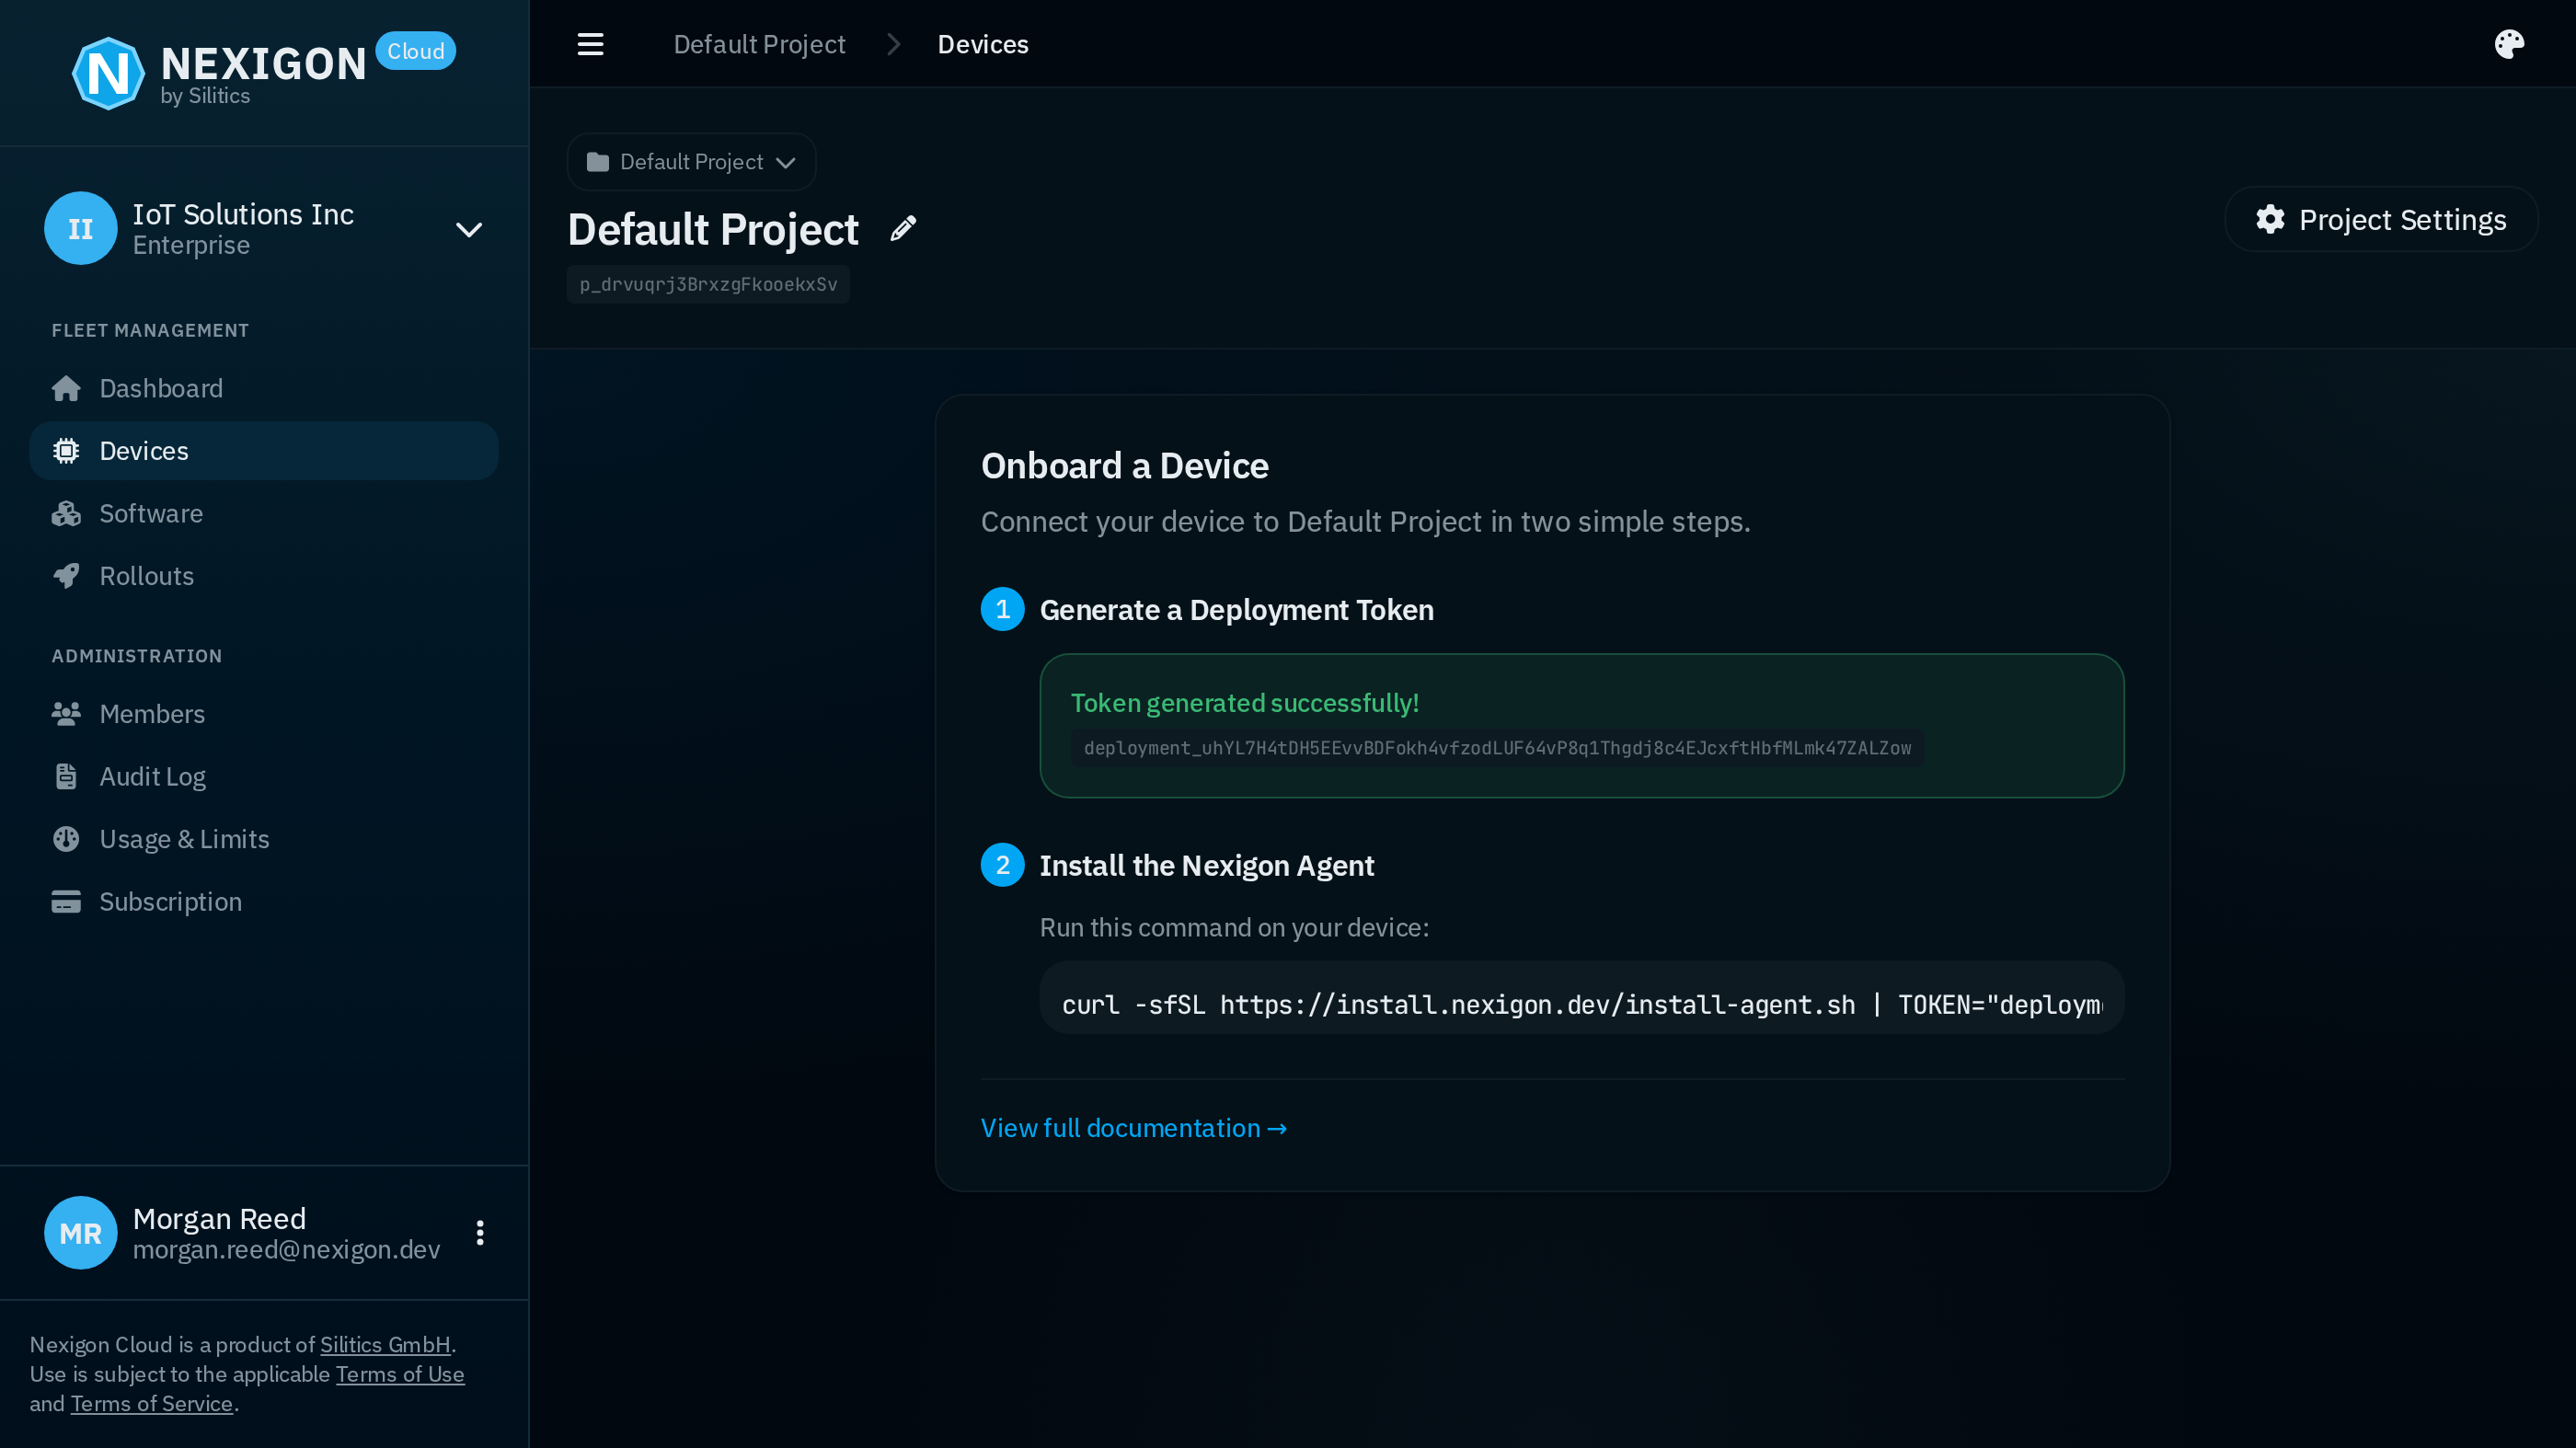
Before you can connect a device, you need to generate a deployment token. You can do so by just clicking on the “Create” button. If you want, you can also give the token a proper name.
To onboard a device, you need to install and configure Nexigon Agent. Nexigon Agent is Nexigon’s open-source device agent available for Linux, macOS, and Windows.1 For the purposes of this quickstart guide, we will assume that your device runs Linux. For other operating systems, please follow the platform-specific instructions.
To download and install Nexigon Agent on Linux in an ad-hoc way, run the following command as root:
curl -sfSL https://install.nexigon.dev/install-agent.sh | TOKEN="..." shHere, TOKEN needs to be set to the deployment token of the project you want to connect the device to. You can also copy this command from the Nexigon device onboarding page. The URL of the Nexigon instance can be changed by setting the HUB_URL environment variable. By default, https://eu.nexigon.cloud is used. If you are on the US instance of Nexigon Cloud, use HUB_URL="https://us.nexigon.cloud".
The installation script will install Nexigon Agent to /usr/bin and further install a Systemd service. For production, we recommend using Yocto, Rugix, or a similar build system for embedded Linux.
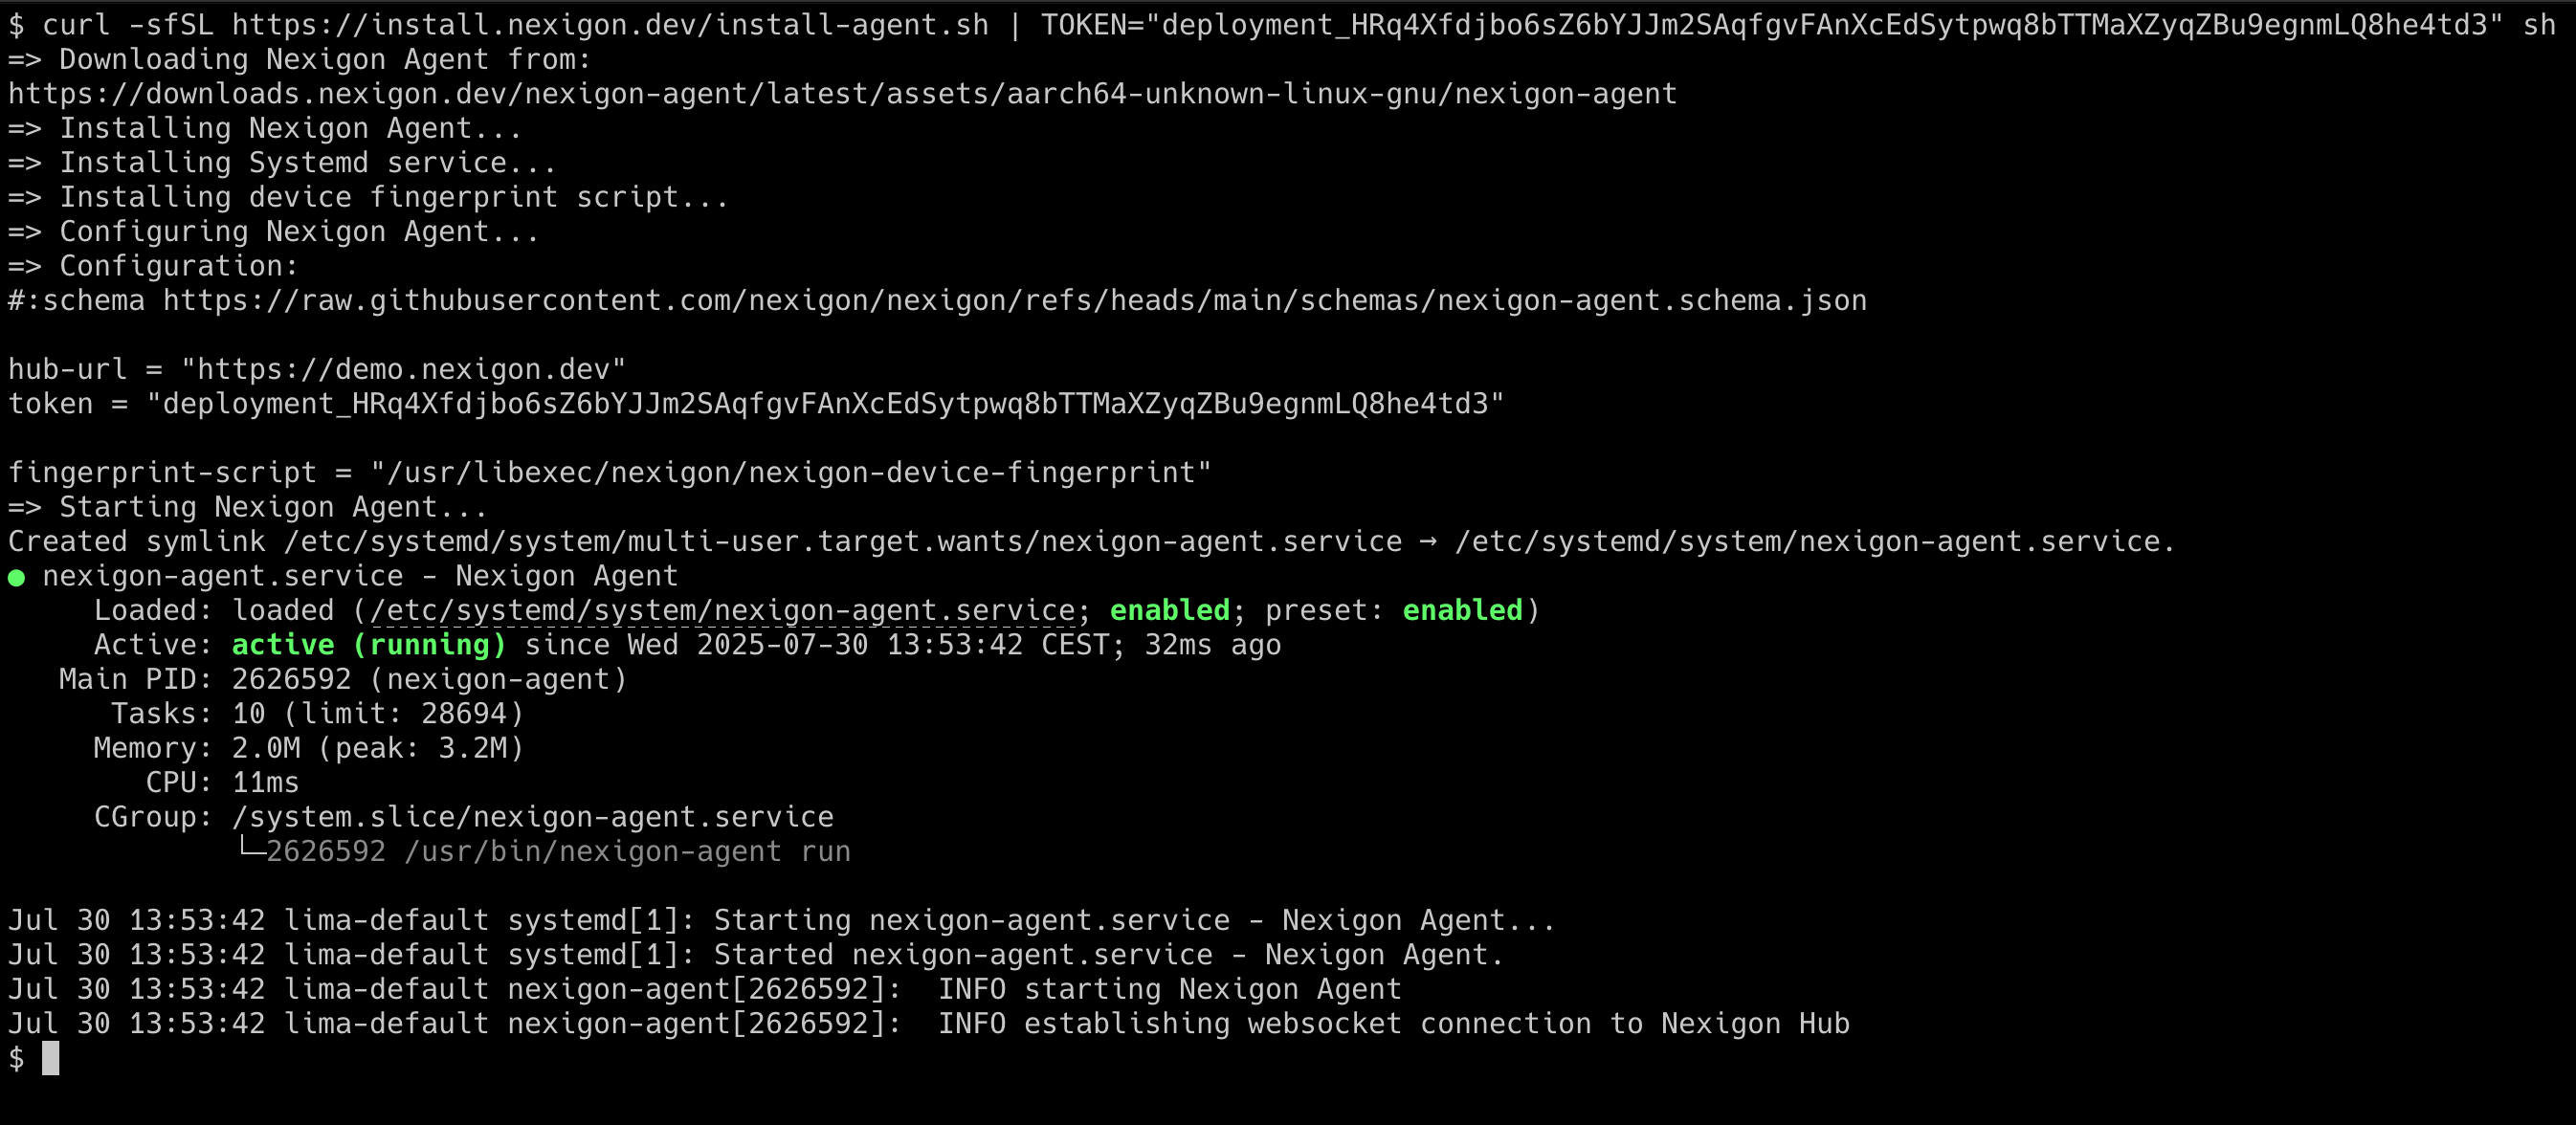
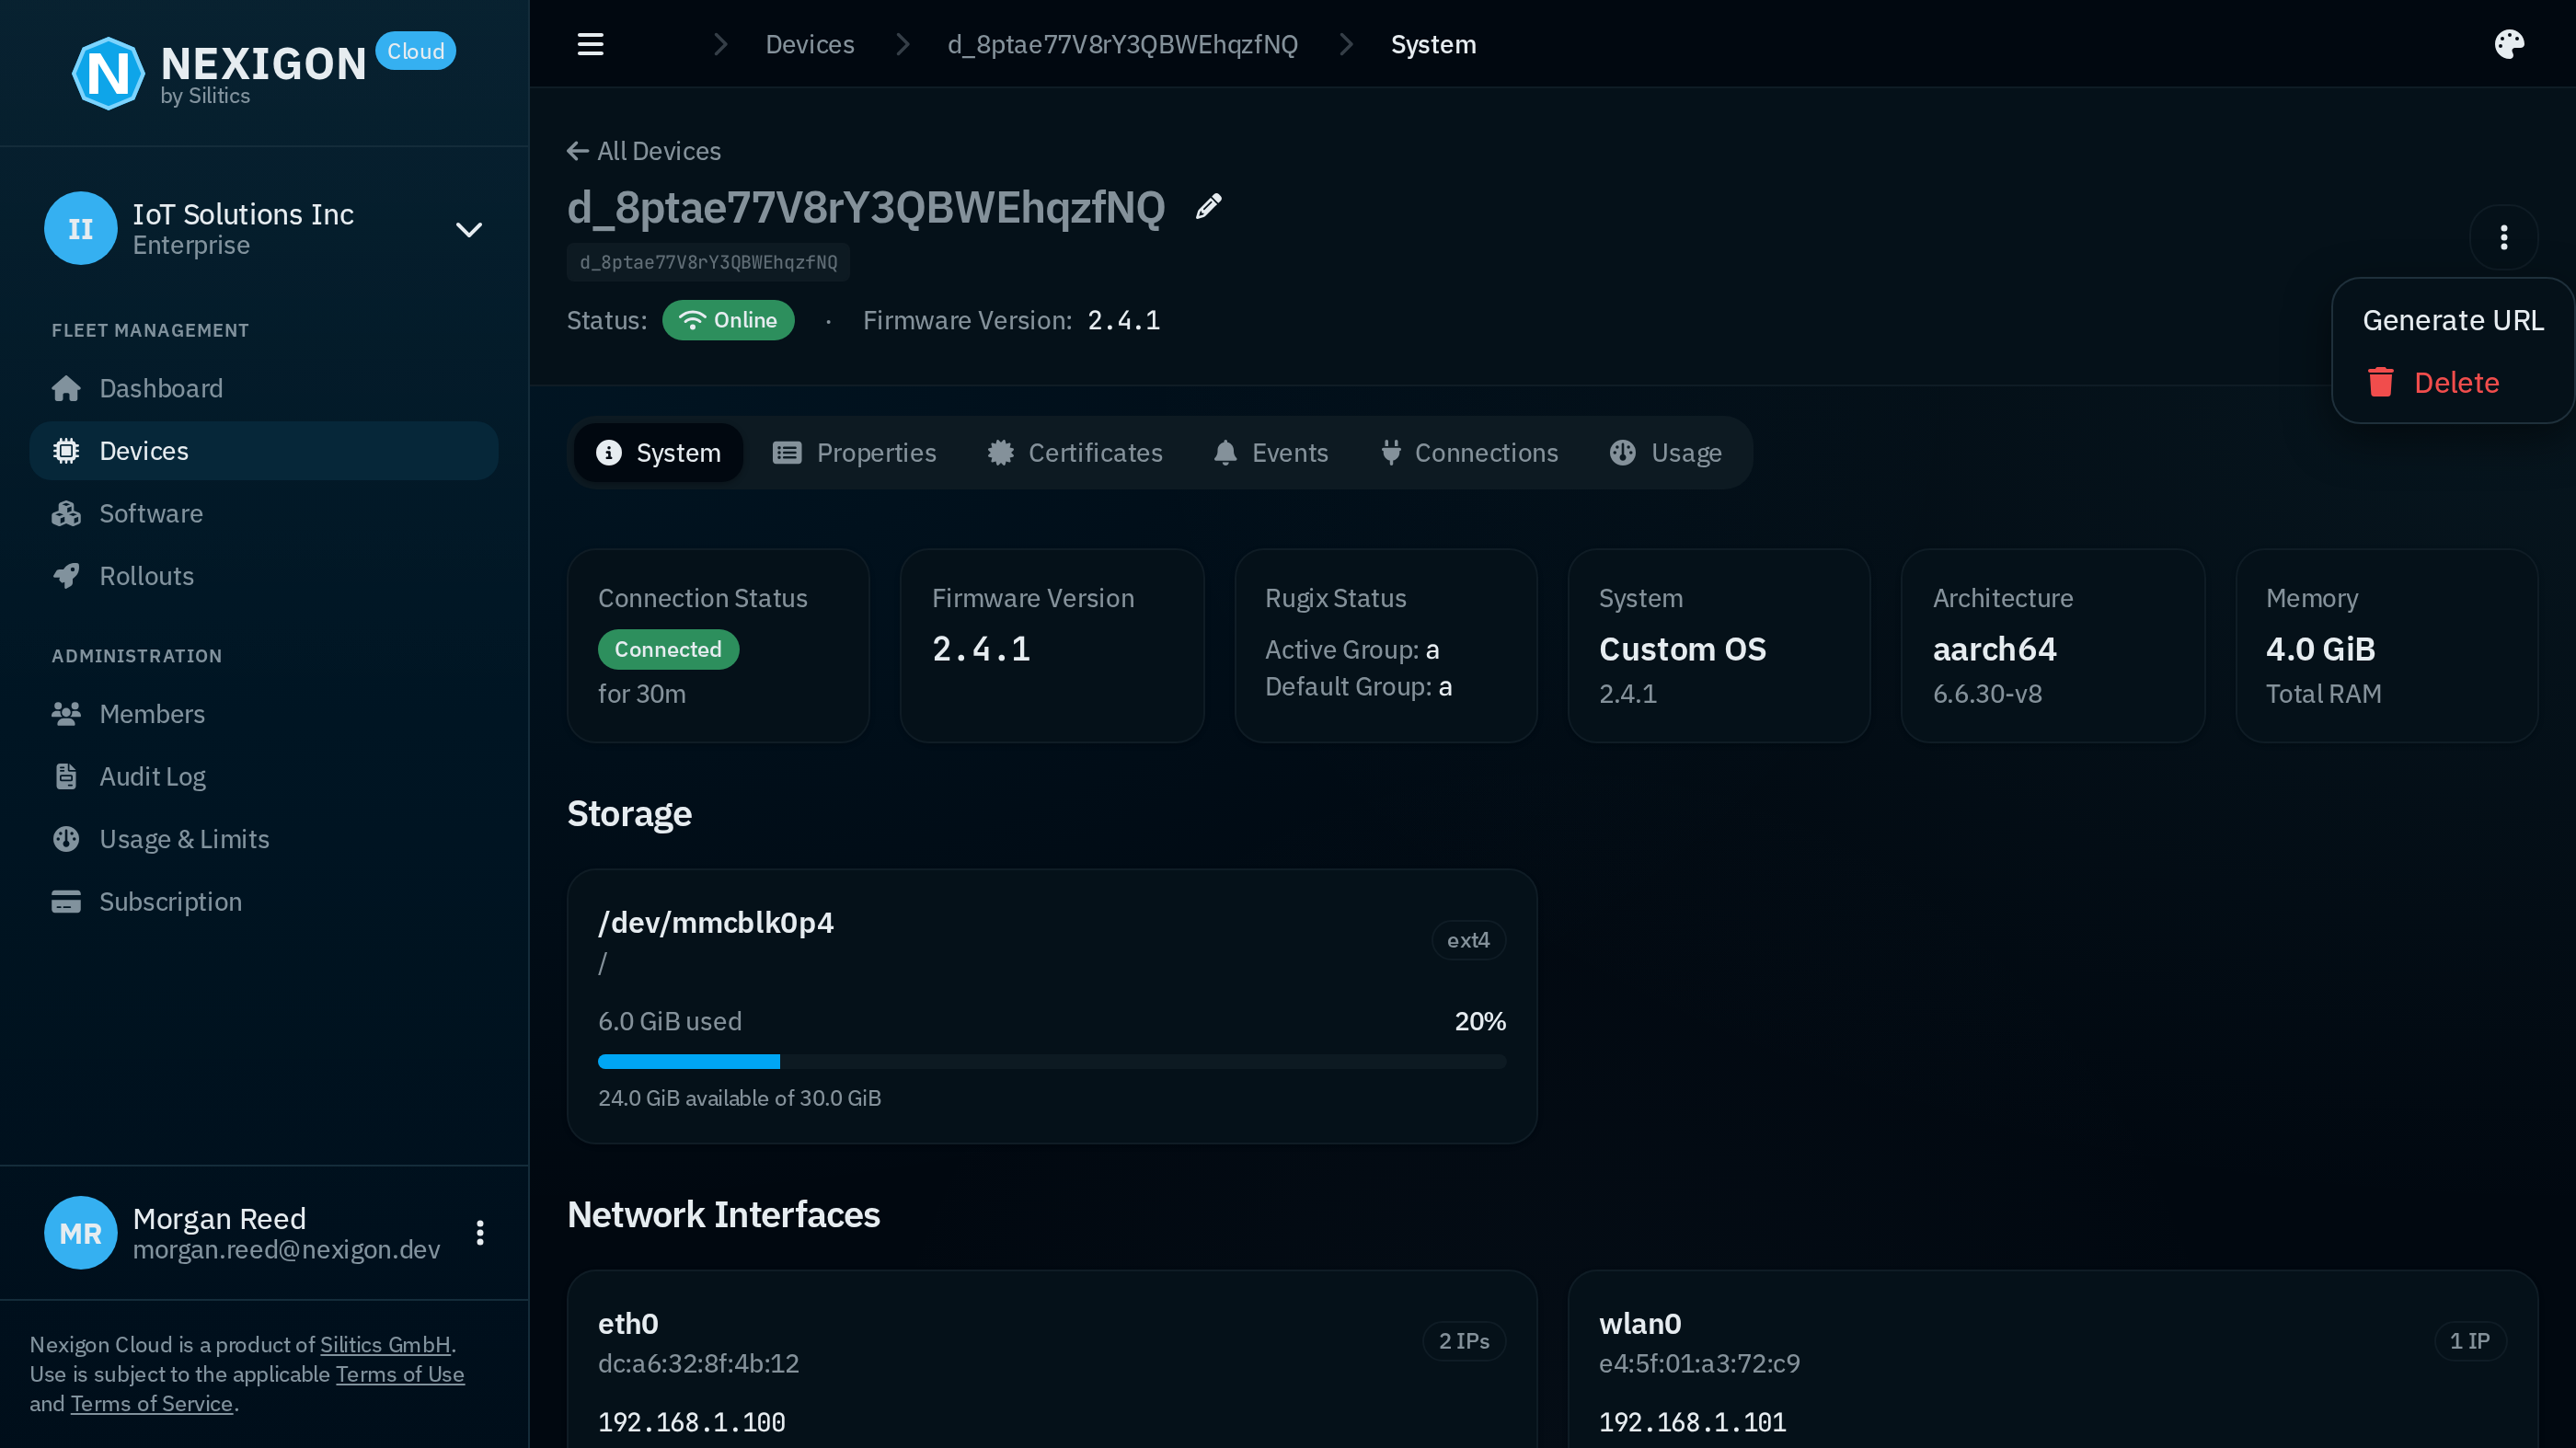
If the installation has been successful, the installer should have started the agent and the agent will try to connect to Nexigon. If you refresh Nexigon’s UI, you should now see a new, unnamed device:
If you click on the device, you get further information about it. Here, you also find an overview over the device’s certificates. By default, deployment tokens are configured to allow for automatic provisioning where the first certificate presented by a new device is accepted. Of course, you can also disable this feature and manage device certificates explicitly, e.g., backed by your own CA.
Establishing a Remote Connection
In case the device runs a local webserver, you can establish a remote connection directly through the Nexigon UI, via the “Generate URL” menu item. The Generate URL dialog allows you to generate a URL with an access token to access an HTTP server running on a specific port.
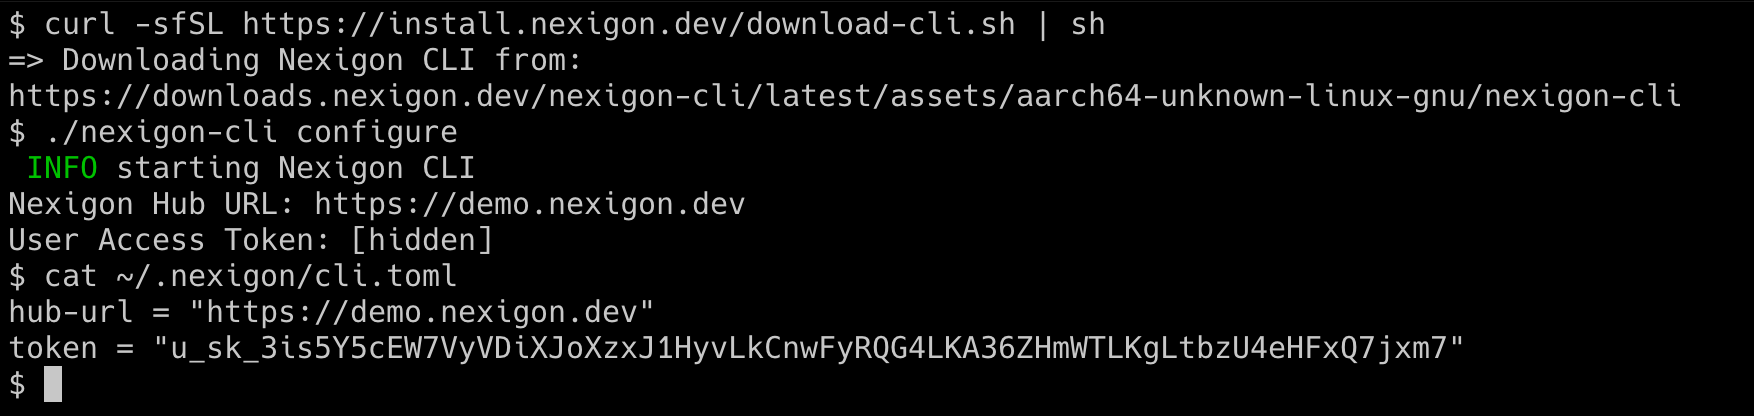
Alternatively, you can use the Nexigon CLI to establish a remote connection and forward arbitrary ports of the device to your local machine. On macOS and Linux, you can download Nexigon CLI with the following command:
curl -sfSL https://install.nexigon.dev/download-cli.sh | shThis will download the CLI to the current working directory. You can then run it with:
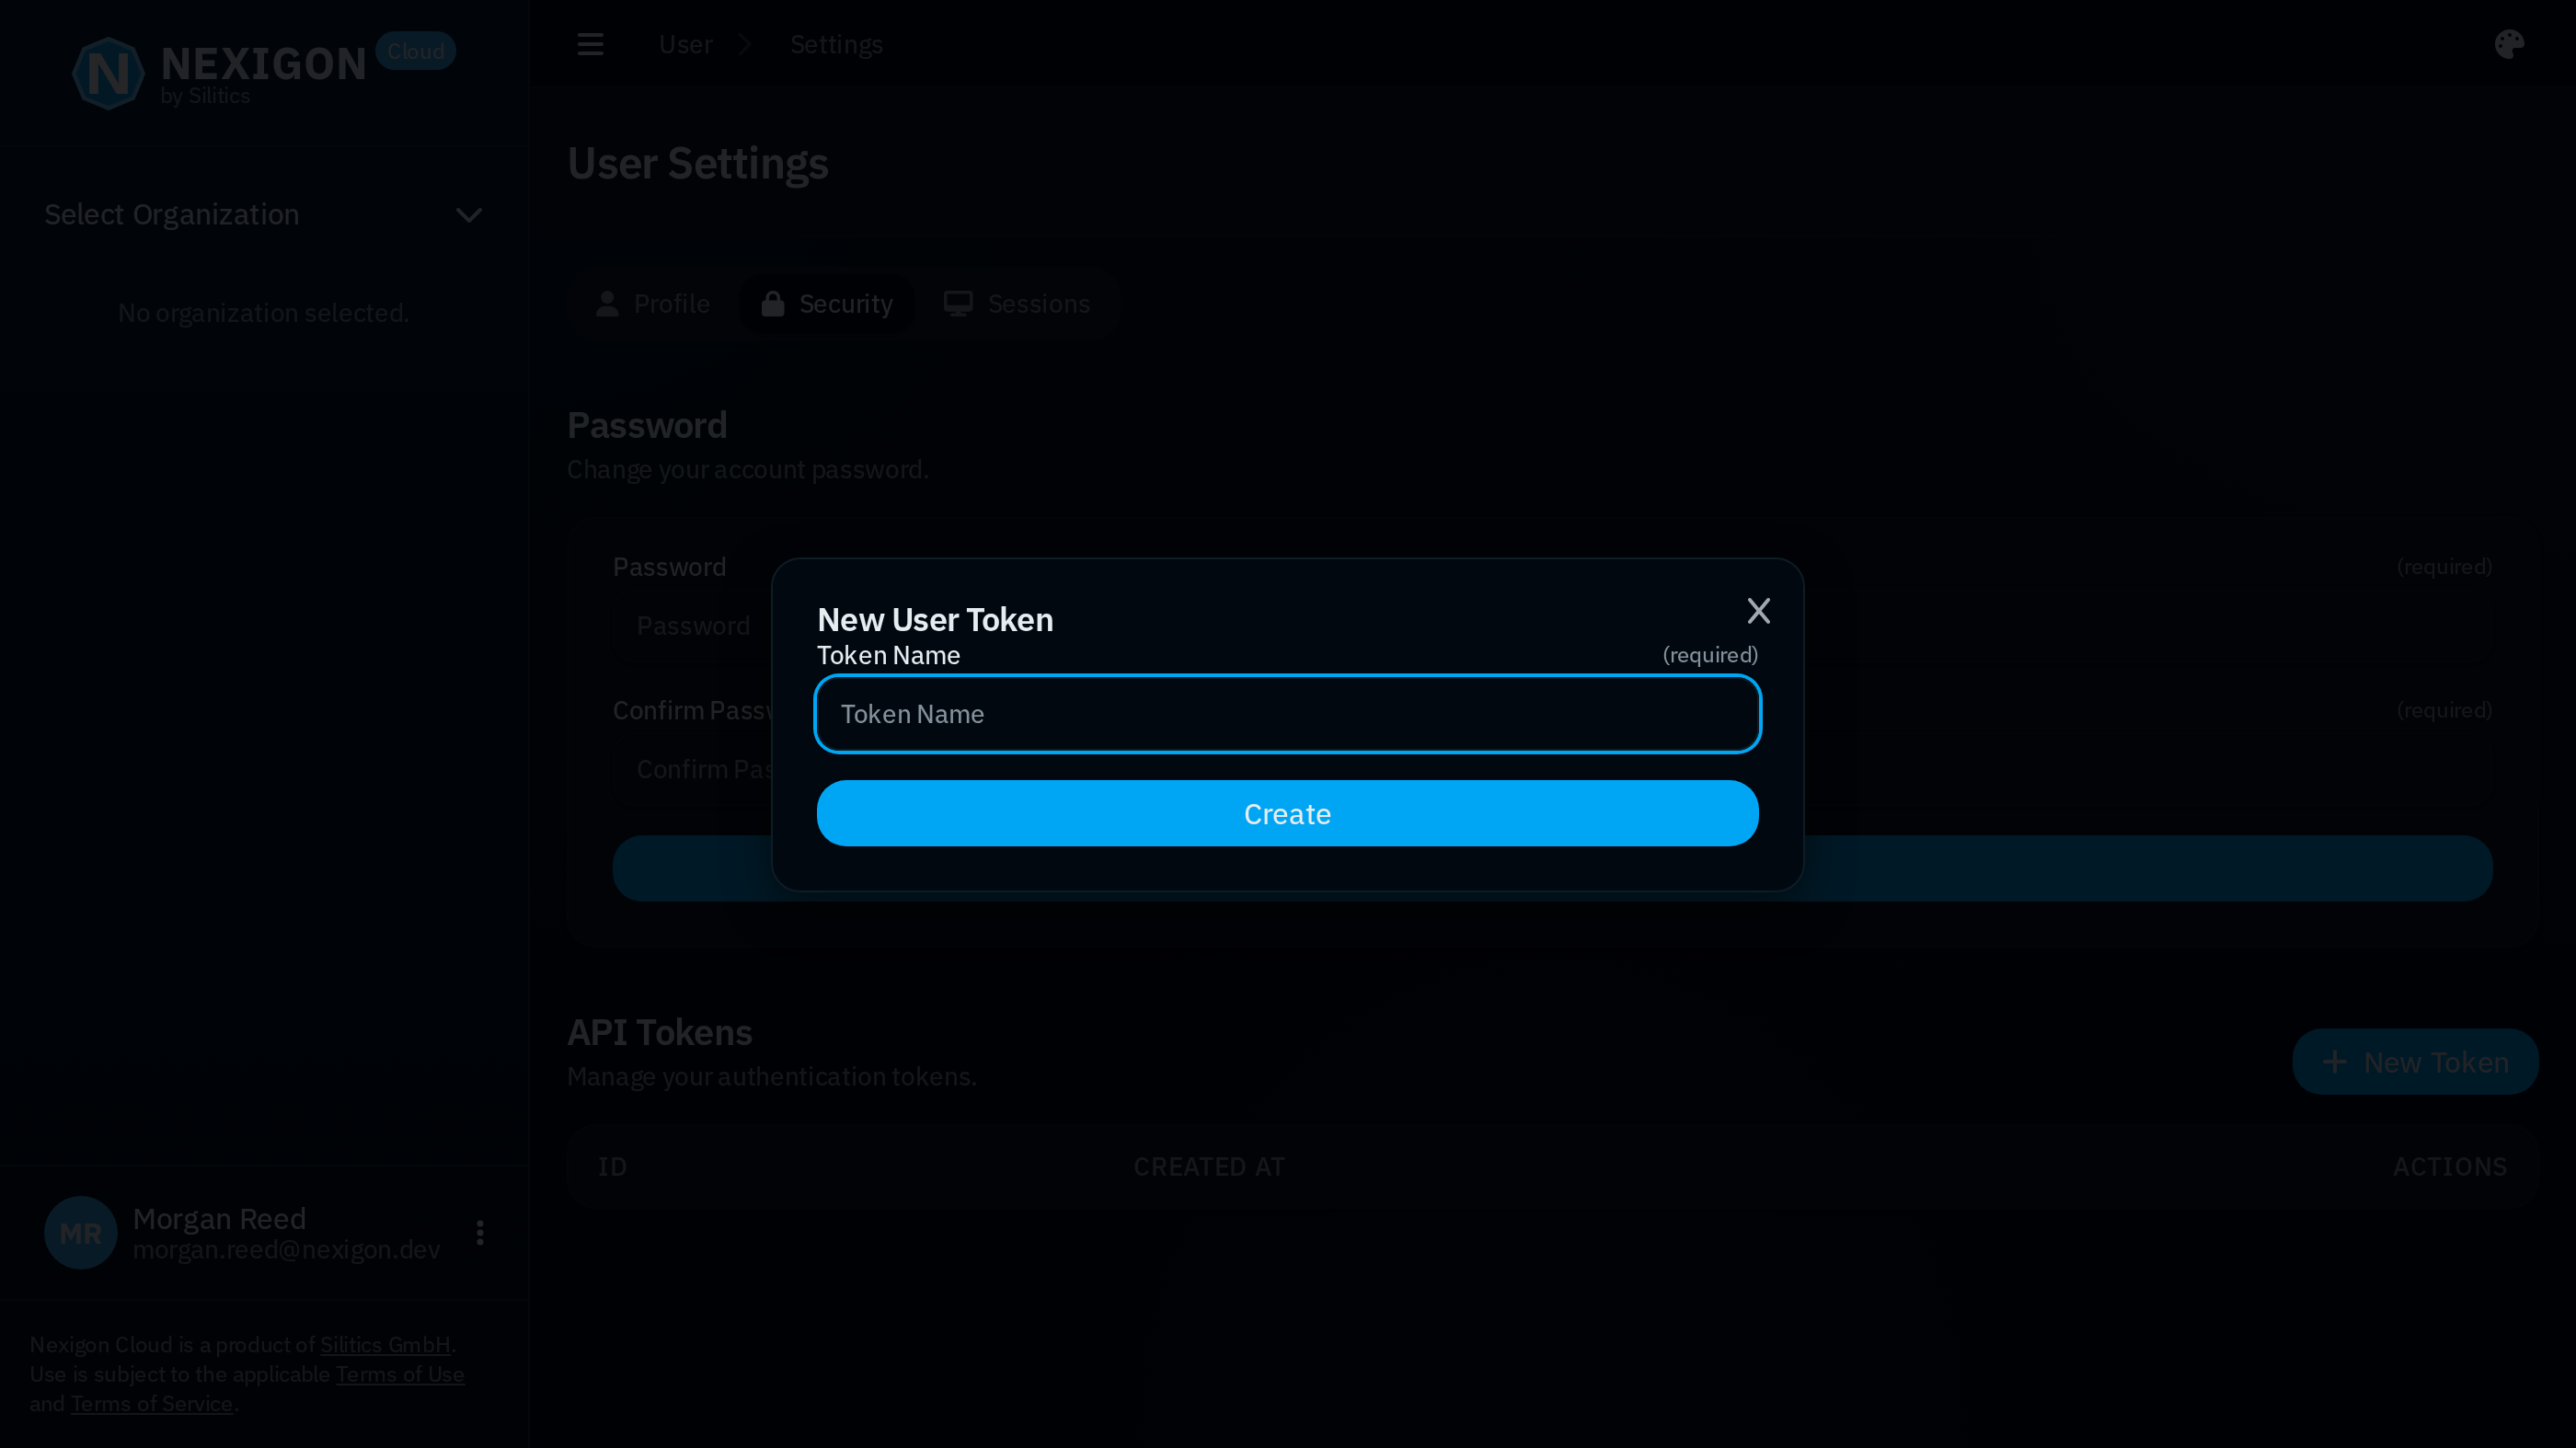
./nexigon-cliTo use the CLI and connect to the device, you need to configure the CLI with the URL of the Nexigon instance and a user access token. To create an access token for your user, open the user’s security settings by clicking on the user icon in the bottom left, then go to Settings and then Security. By clicking on New Token, you can create a new user token. As with the deployment token, you need to copy the token after creation, as you will not be able to access it through Nexigon afterwards.
To configure the CLI, run the following command, and enter the instance URL and your user token:
./nexigon-cli configureThe command will create a configuration file ~/.nexigon/cli.toml.
Afterwards, you will be able to establish a remote connection to the device with:
nexigon-cli forward <device id> <local port>:<remote port>Here, <device id> is the ID of the device you want to connect to. The device ID starts with d_ and can be found in the Nexigon UI. For instance, to forward port 22 of the device to port 2222 on your local machine, run:
nexigon-cli forward <device id> 22:2222You can then use the forwarded port to connect to the device via SSH:
ssh -p 2222 root@localhostConclusion
You have successfully onboarded a device and established a remote connection to it. From here, you can start further exploring Nexigon’s capabilities: Device Configuration, Device Telemetry, Software Updates.
If you have questions or feedback, we’d love to hear from you. Just get in touch.
Footnotes
-
Built-in functionality does vary across the different platforms. ↩